Every developer gets into a situation from time to time, where you’re developing a new feature, all the tests pass, you run the application, test everything thoroughly, the result looks great! So you push the code, it gets deployed and… it doesn’t work. What the hell is going on?! It works on my machine!
To prevent these things from happening we try to have our development environment match the production environment as close as possible. But matching it exactly is not always possible.
One thing that’s often different is the development environment is HTTP and the production environment is HTTPS. Browsers do their best to mitigate these issues: most things that require HTTPS in production, like service workers and PWA’s, will also work on localhost. There are a few exceptions though. Things that often cause trouble are secure cookies and mixed content.
Luckily there’s a way to use HTTPS for all your development servers without having to update the code: a HTTPS-enabled reverse proxy. This guide will go through setting up Traefik proxy as an HTTPS-enabled reverse proxy on your development machine.
The code for this guide is also available on GitHub.
Prerequisites
mkcert
Install mkcert: web.dev (Google) has an excellent guide on using HTTPS in development, so this guide will not go through all of that. There is only one downside to their approach: each server needs HTTPS to be configured separately. This guide aims to fix that.
Follow the guide on web.dev until you’ve installed mkcert, or follow mkcert’s official installation instructions, we will continue from there. You don’t need to generate any certificates for localhost or configure a server.
If you’re using Windows Subsystem for Linux (WSL), mkcert -install will not install the CA certificate for browsers running on Windows. You will have to let them trust the root CA certificate manually. You can find out where the root CA certificate is stored by running mkcert -CAROOT.
Docker Compose
You will need docker compose to run the reverse proxy, so make sure you have Docker and Docker Compose installed on your system.
Try docker compose --help to see if you already have it installed.
Overview
There are 3 high-level steps you need to go through:
- Pick a domain name and generate the certificates for it
- Configure and run the reverse proxy
- Make sure your domain name resolves to localhost
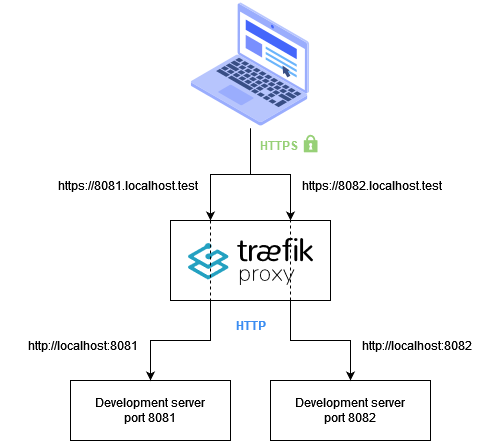
You will learn how to configure Traefik proxy to forward URL’s of the form https://<port>.localhost.test to http://localhost:<port>. That way, you can rely on Traefik to handle encryption for you without making any changes to your development server.
Here’s an overview of the solution:

Pick a domain name and generate the certificates for it
This guide will use <port>.localhost.test, but you can pick your own domain name if you like. Just make sure there is room for the <port> subdomain somewhere. We use .test as the top-level domain because it is intended for testing purposes and won’t interfere with publicly available domains. Since you’re trying to resemble a production environment as closely as possible, avoid domains that would receive special treatment, like domains names ending with .localhost.
To generate the certificate, run mkcert "*.localhost.test". You should get 2 files:
_wildcard.localhost.test.pem, the certifcate_wildcard.localhost.test-key.pem, the certificate’s private key
That’s it 😊
Configure and run the reverse proxy
Create a docker compose file called docker-compose.yml:
version: '3'
services:
  traefik:
    image: traefik:latest
    ports:
      # Bind port 80 to redirect http to https
      - "80:80"
      # 443 is the default port for HTTPS
      - "443:443"
      # Expose Traefik's dashboard on port 8099 because 8080 is popular for development servers
      - "8099:8080"
    volumes:
      # Mount Traefik configuration file
      - ./traefik.yml:/etc/traefik/traefik.yml:ro
      # Mount a local directory called config to the Traefik config directory
      - ./config:/etc/traefik/config:ro
      # Mount the certificate files
      - ./_wildcard.localhost.test.pem:/etc/traefik/_wildcard.localhost.test.pem:ro
      - ./_wildcard.localhost.test-key.pem:/etc/traefik/_wildcard.localhost.test-key.pem:ro
Since docker-compose.yml mounts a Traefik configuration file called traefik.yml you’ll have to create it:
api:
  insecure: true

entryPoints:
  # The web entry point redirects to HTTP to HTTPS
  web:
    address: ":80"
    http:
      redirections:
        entryPoint:
          to: webSecure
          scheme: https
  # webSecure is the HTTPS entry point
  webSecure:
    address: ":443"

# Tell Traefik to load dynamic configuration from files
providers:
  file:
    directory: /etc/traefik/config
You just told Traefik to load dynamic configuration from files using the file provider.
This file provider will look for configuration files in the config directory you mounted in docker-compose.yml. Create the config directory along with 1 file inside it: config/https-localhost-test.yml, this is where the magic happens.
It’s a long file, but there’s a lot of repetition. You can find the full version here.
# Configure HTTPS certificates
tls:
  certificates:
    - certFile: /etc/traefik/_wildcard.localhost.test.pem
      keyFile: /etc/traefik/_wildcard.localhost.test-key.pem

http:
  # The routers listen for <port>.localhost.test and forward the request to their corresponding service
  routers:
    to-https-localhost-test-8050:
      rule: "Host(`8050.localhost.test`)"
      tls: {}
      service: https-localhost-test-8050
    to-https-localhost-test-8051:
      rule: "Host(`8051.localhost.test`)"
      tls: {}
      service: https-localhost-test-8051
    # ...
    to-https-localhost-test-8099:
      rule: "Host(`8099.localhost.test`)"
      tls: {}
      service: https-localhost-test-8099
  # The services forward the request to host.docker.internal:<port>
  services:
    https-localhost-test-8050:
      loadBalancer:
        servers:
          - url: http://host.docker.internal:8050
    https-localhost-test-8051:
      loadBalancer:
        servers:
          - url: http://host.docker.internal:8051
    # ...
    https-localhost-test-8099:
      loadBalancer:
        servers:
          - url: http://host.docker.internal:8099
From the configuration file, it should be clear that you’re telling Traefik to listen for requests in the form https://<port>.localhost.test and forward them to http://host.docker.internal:<port>. But what’s up with this host.docker.internal stuff? Why isn’t it localhost?
If you think about it, using localhost doesn’t make sense here. From the container’s perspective, localhost is anything that’s running inside the container. But only Traefik is running inside the container. Development servers run on the machine that’s running Docker. You need a mechanism to connect to those services.
In Docker terms, “the machine that’s running Docker” is called the host. Docker Desktop has a special DNS name for the host: host.docker.internal. That’s the DNS name from the configuration file.
There is one gotcha though: it won’t work if you’ve installed Docker without Docker Desktop. Luckily there’s an easy workaround. You can add this extra_hosts section to the traefik service in docker-compose.yml:
services:
  traefik:
    # ...
    extra_hosts:
      - "host.docker.internal:host-gateway"
Traefik should now start without any problems by running docker compose up:

Make sure your domain name resolves to localhost
You’re almost ready to test, but there is still one thing missing. When you type in https://8080.localhost.test in your browser or run curl https://8080.localhost.test/products from the command line, your OS will ask a DNS Server “What’s the IP address for “8080.localhost.test”?” and that DNS server will have no idea. Luckily, the hosts file can help you with that.
You will find your hosts file at /etc/hosts on Unix-based systems and C:\Windows\System32\drivers\etc\hosts on Windows. Open the file and add the following lines:
127.0.0.1   8050.localhost.test
127.0.0.1   8051.localhost.test
...
127.0.0.1   8099.localhost.test
Testing the setup
You’re now ready to test!
For a first test, see if you can open https://8099.localhost.test in your favourite browser. You should see Traefik’s dashboard.
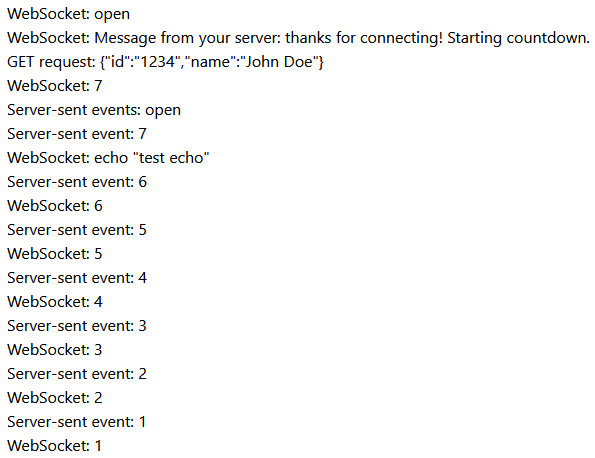
Next, try your own development server. If you don’t have an application or an API to test with, you can clone the repository that belongs with this guide. It has a small test application that makes a GET request, opens a WebSocket and uses Server-sent events. The test application is in the test-app directory, so open a command line window, navigate to the test application directory and run npm install and then npm start. If you don’t have the npm command, you will have to install Node.js first.
Once you see the message “API Server is running on port 8080”, open https://8080.localhost.test in your browser. This should start to appear:

Conclusion
It takes some time to set up, but once it’s running, you can use HTTPS and WSS for all your development servers without making any changes to the servers themselves. This guide configures ports 8050 - 8099. If you want to support a wider range of ports, you can add more configuration to https-localhost-test.yml and to your hosts file.
No more “it works on my machine” for HTTPS-related issues!
